

How can we help?
Search for answers or browse our knowledge base
GTServer and GTWeb
GTServer
GTServer is the application server. It allows:
- Carry out all transactions on the customer master
- Manage the input/output of data between the GT Database and the recipients (sending of e-mails, collection of data transmitted by the recipients, creation of dashboards).
- To publish for the GTAnswer module the statuses of the different campaigns (respondents, response versions, history, etc.).
Installation
- The Setup will install GTServer and associated modules.
Several instances of GTServer can coexist on the same workstation.
Each instance of GTServer is associated with a Windows service.
- Login with the administrator account provided for the installation.
Start SetupGTServer.exe.
Follow the installation wizard.
Then run the installation wizard by selecting the default options.
Server configuration
Once the installation is complete, log on to the workstation with the Windows user account launching the service (service account).
It is preferable to be able to log in with this service account to complete the installation in order to overcome the difficulties related to the rights (under Windows 7, 8, 8.1, 10 and Windows Server 2008 or 2008 R2, 2012 or 2012 R2 and 2016) on the directories created during the configuration of the GTServer instance with another account than the service account.
When registering the key, GTAdmin.exe tries to dialog with the Gathering Tools site to validate this key (via https://www.gathering-tools.com). If this communication is not possible (firewall, use of a proxy or absence of connection to Internet,…), a manual procedure of validation is possible.
GTWeb
GTWeb is the Web application for the synchronous exchange of information (publication, synchronization and response via the http/https protocol).
Installation
There is no setup to launch, only files to copy. The compressed folder “new_gtweb.zip” contains all the scripts for running the new GTWeb.
Installing GTWeb scripts in a Web server
Login with the administrator account provided for the installation.
The first step of the configuration will be to copy the files to the Linux or Windows machine hosting the host web server.
- The files will be copied to the installation directory of your website.
If your website is named (wwwTest) the structure will be as below after copying the files:
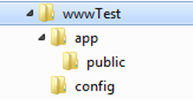
The index.php file is in “public”. The root of “app” contains the application (functions.php and process.php).
The configuration of the instances is in “config”.
Before installing and configuring GTWeb, we suggest that you perform functional tests to make sure that your Web server is operational, accessible to the
- In php.ini, there are three values to increase:
max_execution_time (Sets the maximum execution time of a script, in seconds. This prevents infinite loop scripts from saturating the server. The default setting is 30 seconds).
post_max_size (Sets the maximum size of data received by POST method. To upload large files, this value must be larger than the upload_max_filesize value).
upload_max_filesize (Maximum size of a file to upload).
Web server pre-testing
Web server up and running and accessible
- Create a web page on the website if one does not exist
Example of minimum web page content (to be written in a text file renamed to TestAcces.html for example):
<!DOCTYPE html><html><body> ACCESS WEB PAGE OK </body></html>
You can also use the sample Web page TestWeb_01_Acces.html from the GT installation test files.
- Try to access this web page from a browser running on the machine where the web server is running (with access in http(s):// and not in queue://)
- Try to access this Web page from a browser running on a respondent’s machine.
Both access tests must display in the browser the text contained in the example page.
Operational PHP engine
- Create a php page on the website if it does not exist
Example of minimal PHP script content (to be written in a text file renamed to Test.php for example) :
<php echo “PHP ACCESS OK </br></br>”; phpinfo(); ?>
You can also use the sample PHP page named TestWeb_02_PHPOn.php from the GT installation test files.
- Try to access this web page from a browser running on a respondent’s machine.
The access test must show the PHP page content without errors.
PHP engine to use file uploads
- Create a php file upload page on the website if none exists
Example of minimal PHP script content (to be written in a text file renamed to TestWeb_03_PHPUpload.php) :
<?php
if (!isset($_POST[“submit”])
{echo ‘<form action=”TestWeb_03_PHPUpload.php” method=”post” enctype=”multipart/form-data”>
Select file to upload:
<input type=”file” name=”userfile” id=”fileToUpload”>
<input type=”submit” value=”Upload File” name=”submit”> </form>’;exit;}
if (is_uploaded_file($_FILES[‘userfile’][‘tmp_name’]) {
echo “Upload OK</br></br>”;} else { echo ‘<span style=”background-color:red;” >ERROR Upload</span></br></br></br>’;l}
echo ‘Debug Infos :</br>’;print_r($_FILES);?>
You can also use the sample PHP page named TestWeb_03_PHPUpload.php in the GT installation test files.
- Trying to upload a file by accessing this PHP page from a browser running on a respondent’s machine.
The file upload test should result in a page starting with the text Upload OK.
TCP/IP access to GTServer
If you are not sure about the TCP/IP access from GTWeb to the server, install GTAnswer on the machine on which GTWeb runs and configure an alias to the GTServer .
Check that you can connect with GTAnswer.
Installing GTWeb in an Apache server
The root of the virtual host must be the “public” directory.
Example (Apache 2.4)
<VirtualHost *:80>
ServerName localhost
DocumentRoot D:/site/app/public
<Directory “D:/site/app/public”>
Options +Indexes +Includes +FollowSymLinks +MultiViews
AllowOverride All
Require all granted
</Directory>
</VirtualHost>
The next step is the creation of alias files designating the GTServer instances (essentially ip/name of the GTServer machine and port) to be contacted by the GTWeb scripts.
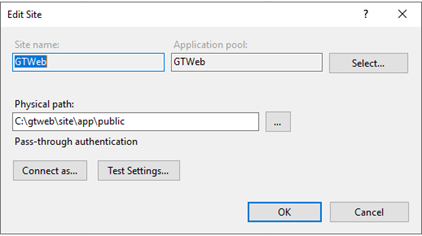
Installing GTWeb in an existing IIS server
On IIS, perform the following operations:
Add a site that points to public (here wwwGTWeb = site)
The next step is the creation of alias files designating the GTServer instances (essentially ip/name of the GTServer machine and port) to be contacted by the GTWeb scripts.
URL Testing
In a browser, enter the URL
http://[server]/index.php?alias=[instance]&t=1
Any value can be set instead of 1 for parameter t. If your web server is listening on the default port 80 you will only have to indicate its name, but if it is listening on another port you will have to add the port number after the server name, for example if 81 is the port number, the URL will be defined as follows:
http://[server:81]/index.php?alias=[instance]&t=1
Output example :
No conf file

– GTServer not started
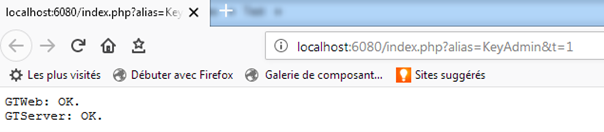
- URL and servers OK :
Description of a .conf file (GTWeb instance to a GTServer instance)
Conf files are text files defining aliases/ GTWeb instances each pointing to a GTServer instance.
The file name must be “instance_name.conf”. The file name is case sensitive.
These .conf files must be created and placed in the “config” directory.
The content is compatible with the old GTWeb. It must contain at least 2 entries:
IPADD=IP of the instance server
PORT=Port of the instance
Optionally, it can contain the SSL settings via SSLMODE
SSLMODE=tls
And the TCP/IP receive timeout parameter between GTWeb and GTServer (in seconds)
TIMEOUT=60
There is no longer any need to specify the version of the protocol.
Example of a .conf file to access a GTServer version 2022 instance
IPADD=127.0.0.1
PORT=3000