

How can we help?
Search for answers or browse our knowledge base
Setting up an Instance
This tutorial aims to explain the creation of a new instance.
Note: you must have access to the GTAdmin module to complete this tutorial.
Preliminary operations
Make sure you have the following:
- Access to a compatible database for the GT database (repository)
- Access to a compatible database for the customer base
- Access to a dedicated email account using a compatible protocol
- Access to a web server for publication
For compatibility issues, see the Technical Prerequisites.
- Start GTAdmin
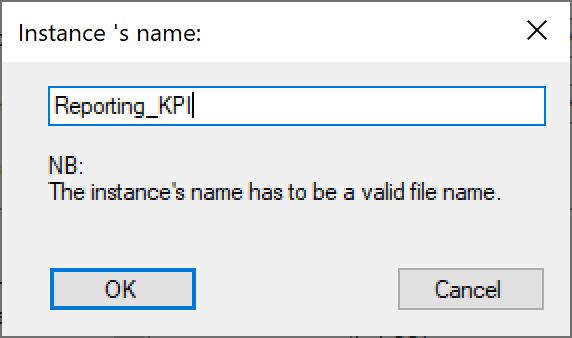
- From the “File” menu, choose the “New instance” option.
- In the dialog box that appears, enter the name of your new instance. As noted, the instance name must be a valid file name and must not contain accented characters.
General settings
The window that then appears allows you to specify the general settings of the instance and in particular:

- Network settings:
- The port number of the instance, which must be dedicated.
- Supported network interfaces (“All” by default).
- Instance directories:
- The log directory
- The Reporting directory (which can be left blank, the directory can be defined specifically for each restitution action)
- The temporary directory
- Logging settings:
- The file logging level (the information present in the log files specific to GT)
- System logging level (information present in Windows log files)
- The number and size of log files. The files are generated in a circular fashion.ie: when the upper boundary is reached, the first log file is deleted and reused.
Once you have entered these settings, click on the “Next” button
Security
Certificates
Your instance can use certificates. These certificates are used to encrypt transactions and integrate your instance into a PKI (Public Key Infrastructure)
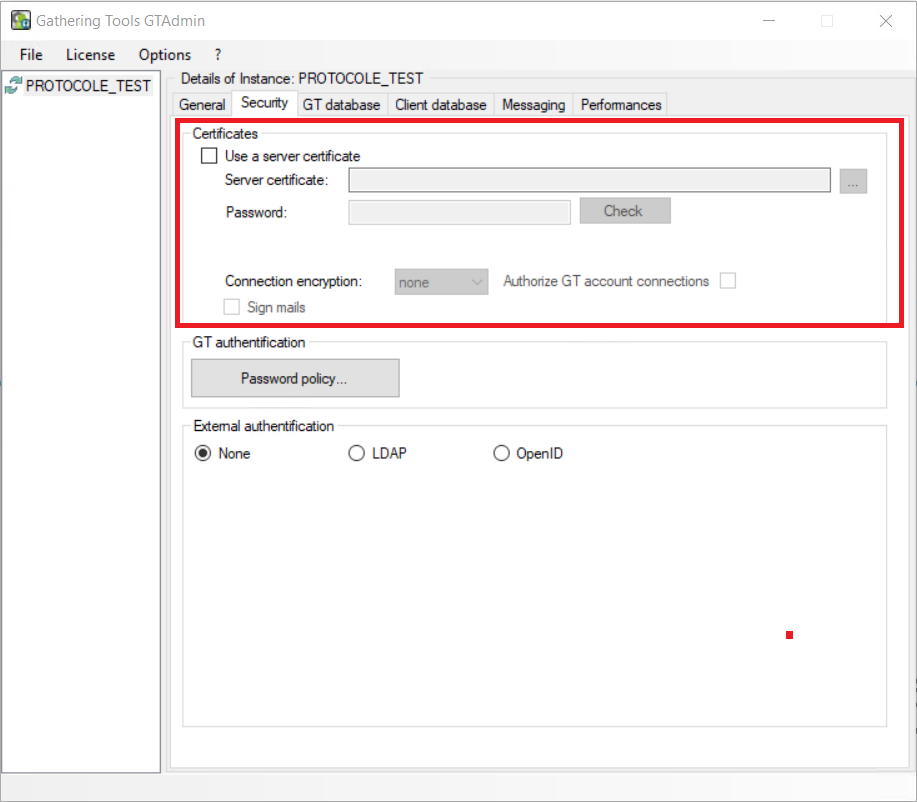
- Select a certificate by clicking on the “…” button.
- Type the password and click the “Verify” button. If the password is correct, the “Display the certificate” button appears, allowing you in particular to know the certificate issuing authority as well as its validity dates.
- If applicable, choose an encryption protocol.
- If necessary, check the boxes “Check client certificates” and “Sign sent emails”
- Click the “Next” button.
Note: GTAdmin accepts certificates in .p12 and .pfx format
User authentication
You have 2 options to authenticate users: Authentication with a GT account or external authentication with LDAP(s) or OIDC.
GT authentication
GT authentication is a proprietary security that encrypts account information in the GT Base.
By clicking on the “Password Policy” button, you can determine:
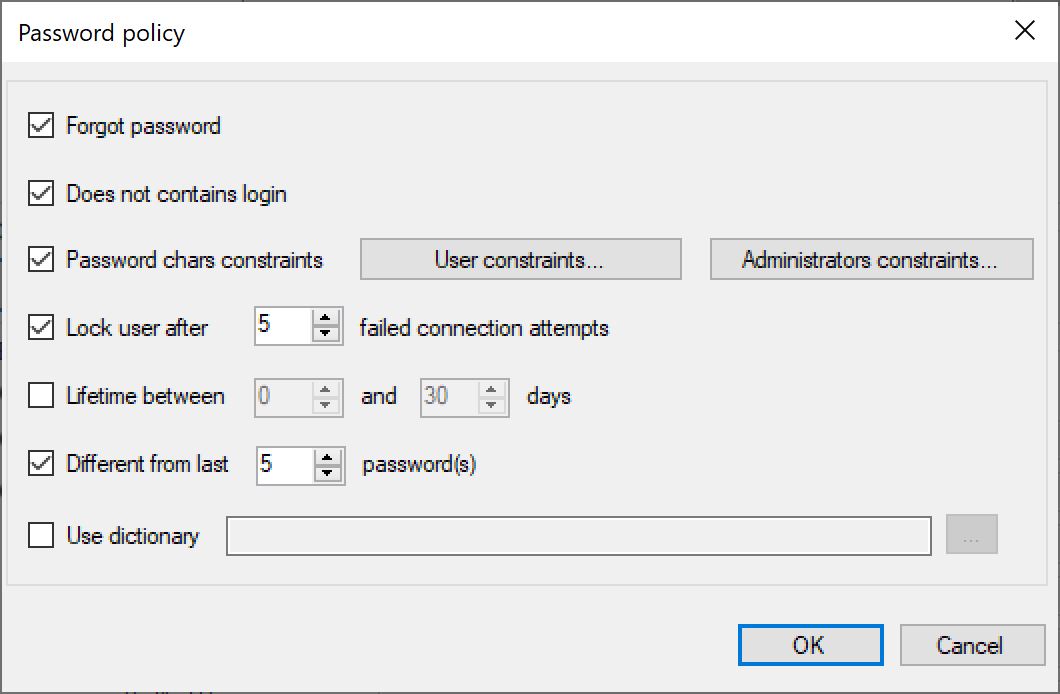
- Whether users can request to renew their password. If this option is not activated, the administrator will have to take care of renewing the passwords forgotten by the users.
- If you allow users to use a password identical to the login
- Constraints on passwords, with different constraints for users and administrators
- The number of failures allowed before blocking the account (only an administrator can unlock it)
- The lifespan of passwords
- Memorization of passwords to force users who renew them to choose a password different from the last X
- An exclusion dictionary: provide a text file containing a list of terms to be excluded from passwords
External authentication
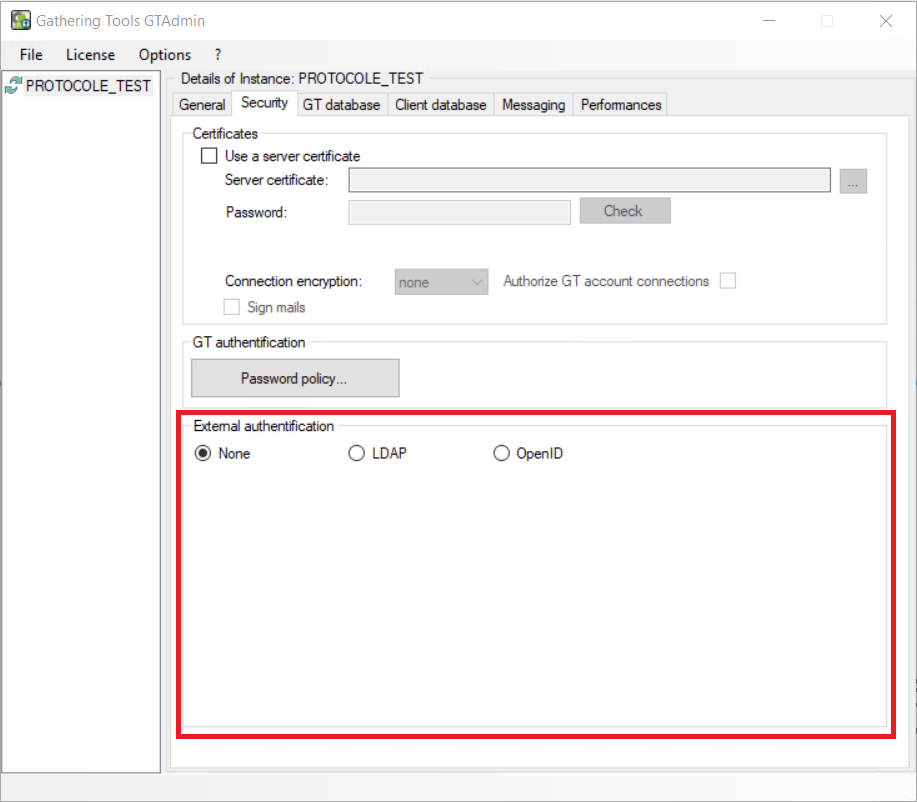
External authentication uses your company’s directory. Thus, all users of the company can connect to the instance with their usual usernames and passwords. However, they will not have access to any project until rights have been assigned to them:
- Automatically for recipients and respondents via a collection or restitution launch action
- Manually for other user categories (see article: Users and rights management)
Note 1: if your instance uses external authentication, you will not be able to create an account creation action: all the accounts are already present in your company directory. User management and rights withdrawal actions will, however, be available.
Note 2: it is possible to combine external authentication and GT authentication, but in this case, only administrators can be declared via GT authentication.
Note 3 : You must contact your IT department to have your configuration elements.
1) LDAP(s) authentication
- “mail” : user’s email
- “distinguishedname” : the user’s complete DN
In GTAdmin, you must fill in :
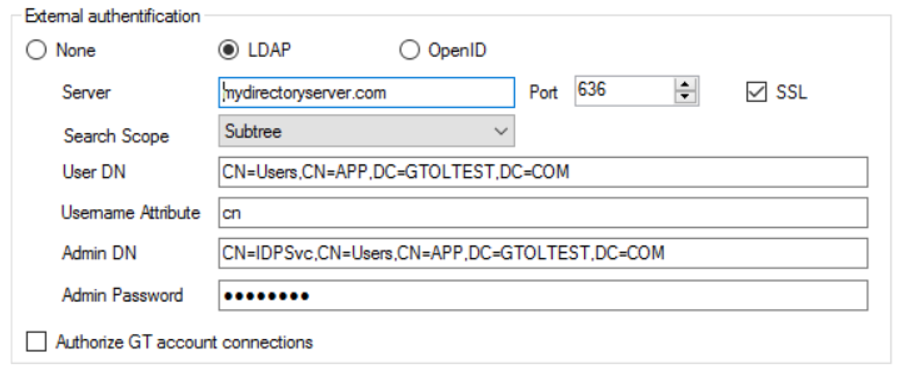
- Server : IP address, domain name, LDAP server name (if on the same network)
- Port : port used for connection (default 369 for LDAP and 636 for LDAPS)
- SSL : If the connection needs to be encrypted (if yes LDAPS connection otherwise LDAP)
- Search Scope : For “One level”, the search applies only to users in the specified user DN. For “Subtree”, the search applies to all subtrees of the specified user DN
- User DN : Complete DN (Distinguished Name) of the LDAP tree where the users are located, this DN is the parent of the LDAP users
- Username Attribute : Name of the LDAP attribute that is associated with the GT username. For many LDAP providers this will be ‘uid’, for the active directory it may be ‘sAMAccountName’ or ‘cn’
- Admin DN : DN of the LDAP administrator, which will be used by GT to access the LDAP server
- Admin Password : LDAP Administrator Password
2) OIDC authentication
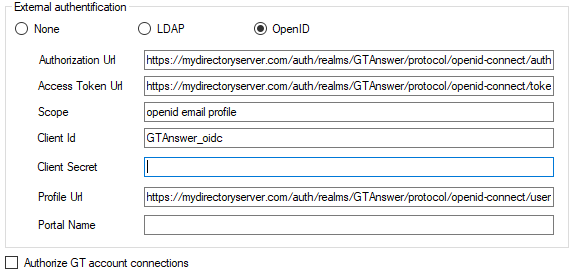
The information necessary for the proper functioning of any OAuth authentication is:
- You must enter in GTAdmin:
- Autorisation Endpoint (url)
- Token Endpoint (url)
- Client id
- Scope : must contain access to the user’s email
- User profile Endpoint (url)
The user profile must contain the following fields:
- “preferred_username” : username that will be used by GT
- “email” : user’s email
- “given_name” (optional): user’s first name
- “family_name” (optional): user name
Redirection address 127.0.0.1:1327
Client secret is optional: It is a secret password that only you and the authorization server know. This allows you to share information securely and confidentially. It is a symmetric key that is used to encrypt exchanges between the application and the authentication server.
Note:
When you set up your instance so that users can be authenticated from your corporate directory, this is theoretically equivalent to creating a responder GT account for all users in the directory. However, if you look at the user list for the instance (by logging into GTAnswer as an admin or from the GTAdmin interface), you will see that the instance doesn’t contain all of the users referenced in your directory.
However, each user will be able to connect to GTAnswer with the credentials that allow them to connect to the group directory. And when he logs in for the first time, a GT account will be created with his external login. From then on, this user will be visible in the list and can be assigned rights in the usual way.
So, nothing changes for the users, except the login button they will have to click on to connect. And nothing changes for the developers: you can perfectly well execute a campaign launch action whose assignment relationship refers to users who don’t yet have an account: as soon as they log in they will be assigned a respondent account.
However, if you want users to be assigned rights other than respondent (i.e. administrator, developer, manager or validator), then you will have to ask these users to log in at least once in GTAnswer in order to make them appear in the list of users so that you can assign them the appropriate rights.
Connection to GT Database
Each instance needs a database dedicated to its internal functioning. This database will store the list of users as well as the models, actions and campaign data.
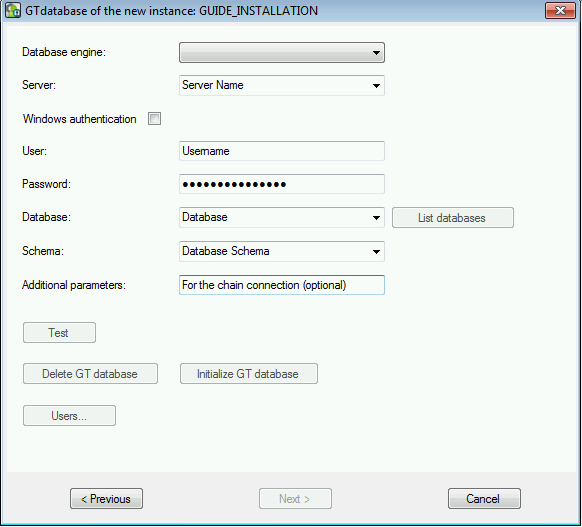
- Select a database type
- Select the server hosting the database
- Specify the authentication mode and, if applicable, the login and password that the GTServer will use to connect to the database.
- Click on the “Test” button to verify that the settings are correct
- Click on the “Initialize GT database” button. All the data in the database will then be erased and the database will be added all the tables and views allowing its use.
- Click on the “Users …” button and add an administrator. It is possible to add any user from this interface but it is advisable to add only one administrator, the other users being added and managed from the interface of the GTAnswer module
- Click the “Next” button.
Connection to the Client Database
Each instance needs a database dedicated to business data.
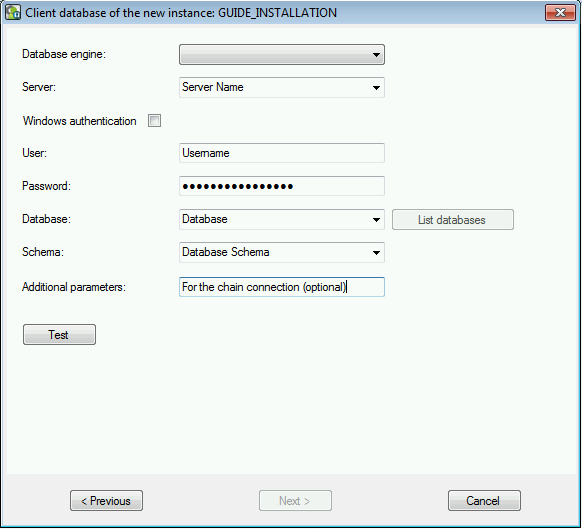
- Select a database type
- Select the server hosting the database
- Specify the authentication mode and, if applicable, the login and password that the GTServer will use to connect to the database.
- Click on the “Test” button to verify that the settings are correct
- Click the “Next” button.
Messaging
Communication between the server and the recipients takes place using the HTTP protocol. Messaging is used for sending notification emails. It is also possible to use messaging to send forms and dashboards as email attachments and resend responses: this is a “fallback connection” for users who could not access the web server.
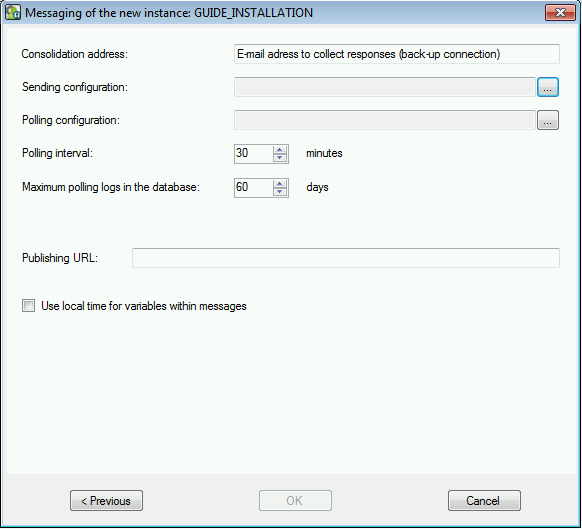
- Select an email address, if applicable, for the consolidation of answers receveived by email.
- Set up a send configuration for email (required).
- Set up a polling configuration for collecting email answers.
- Specify a polling interval (polling can be performed on demand from the GTAnswer interface).
- Specify a publication URL.
- Click the “Ok” button to save the instance.
- The instance now appears in the GTAdmin interface. Right click on the new instance and, in the context menu, click on the option “Install the service”. Specify the Windows account that will start it. The service must be started for the instance to be accessible in GTAnswer.
Configuring Performances for Publishing Launch (available from version 2022)
Default configuration
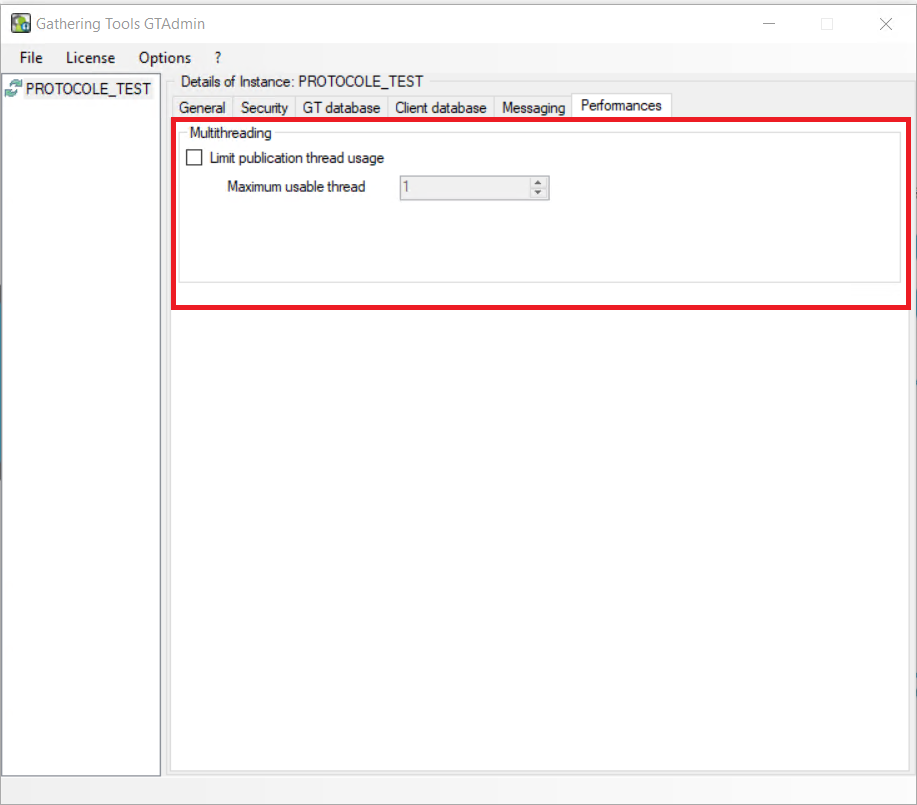
GTServer uses multithreading and takes advantage of a processor’s ability to process multiple threads (threads) at the same time across multiple cores. Instead of tasks or instructions running one after the other, they run simultaneously.
GTServer leverages all default resources to allow you to speed up your application’s responsiveness when launching a publication and, if your application is running on a multiprocessor or multi-core system, accelerate its throughput.
The “Limit publication thread usage” checkbox is cleared and the “Maximum usable thread” drop-down menu is inaccessible (grayed out).
Limiting Threads When Launching Publishing
If you need more control over the behavior of the application’s threads when launching a publication, you can manage the threads yourself and limit the number that can be used.
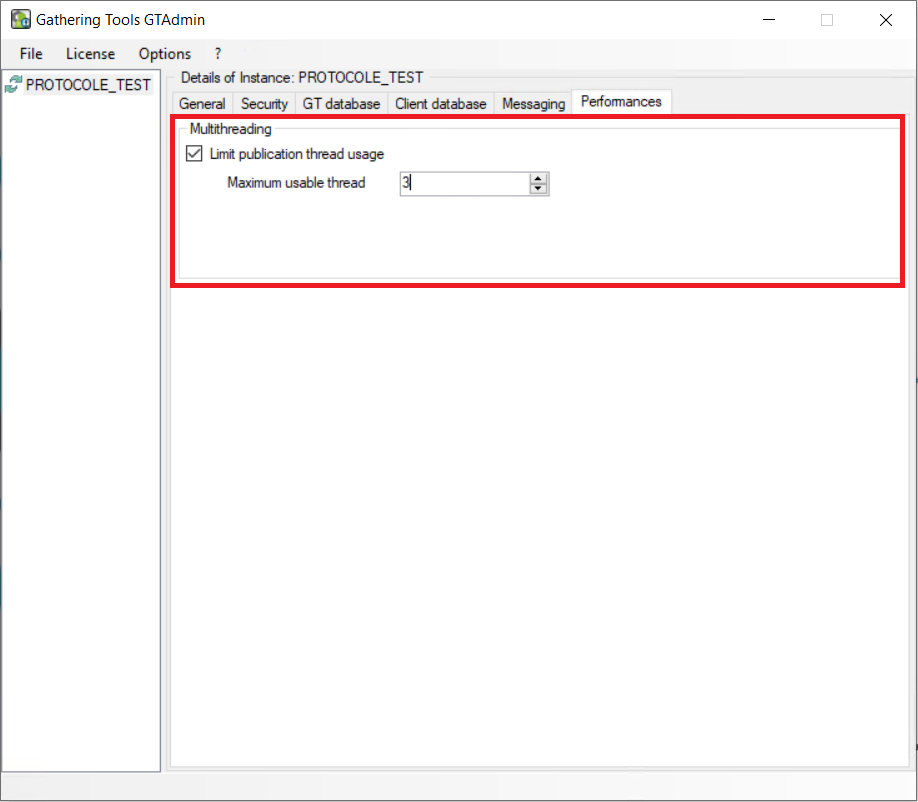
You need to check the “Limit publication thread usage” box, the “Maximum usable thread” drop-down menu becomes accessible (white), and you can then set the maximum number of threads you want.
Declaration of the instance in GTAnswer
Once the instance is created, it must be declared in GTAnswer to be used.
It is generally not necessary for users to declare their instance manually: in fact, it is possible to automatically send them a message (as part of an account creation action, or a collection launch or restitution) containing a configuration url via the variable [[URL_INSTANCE_PARAMS]]
Users only need to click on the link generated by this variable to automatically set up the instance in their GTAnswer client.
The list of instances configured in the GTAnswer client is however accessible from the login page or from the main menu by selecting the “Instances” item.
To add an instance to it:
- In the list of instances, click the “Add (+)” button
- Specify the name of the instance, the server that hosts it and its port number as specified in the general settings
- If you have specified the use of a certificate, specify the encryption protocol as well as the possible use of a client certificate. The “Authorize a different name” option will authorize the connection using a certificate whose “Common Name” (CN) property is different from the server certificate specified when creating the instance.
- Click on the “Ok” button.
The instance is now accessible via GTAnswer, as soon as the service linked to the instance is started.
The installation guide contains all the information you need to configure, configure and test.